So it seems Cornwall did vote after all. I'd rather have lost to a 40% turnout than to a 12% turnout, so I'm happy that democracy has been done.
69.6% voted no to AV, 30.4% yes.
The Lib Dems elsewhere have taken a battering in the local elections. The Scottish Lib Dem leader Tavish Scott has stepped down saying he's taking responsibility for a 'disastrous' result for his party.
Pressed on whether Clegg should do the same, Scott replied that he thinks Cleggy-boy does take responsibility for the Liberal bullet-to-the-stomach. Funny then, that the news is full of Tory put-downs - Lib Dems accusing their parliament lovers of being 'tribal'.
What is a political party if not a tribe? Is it possible that the Lib Dems threw their lot in with the wrong team 12 long months ago? That policy after policy has been dictated by the right wing, when so much of the country voted middle-left or left?
Time for the yellows to now accept that with the rejection of an alternative vote, this is the closest they will come to power for another long generation.
Make hay while you can still feel the warmth of the sun, Cleggy-boy. For tomorrow might just see the dark clouds return.
Saturday, 7 May 2011
Thursday, 5 May 2011
How to make Beautiful British Bunting
Bit late with this as the Royal Wedding was last week - but really it's never too late to have bunting up, is it?
 First, cut yourself out a card template that is 7" from top to tip, and 6" wide.
Pin this to your swatches/ leftover pretty materials and cut yourself a pile of, er, bunts using pinking scissors... Take a length of ribbon and zig-zag stitch your material to it, leaving an inch gap between each triangle:
 Et voila! Now hang and if required, sing Jerusalem! at the top of one's voice:
 First, cut yourself out a card template that is 7" from top to tip, and 6" wide.
Pin this to your swatches/ leftover pretty materials and cut yourself a pile of, er, bunts using pinking scissors...
 Take a length of ribbon and zig-zag stitch your material to it, leaving an inch gap between each triangle:
 Et voila! Now hang and if required, sing Jerusalem! at the top of one's voice:
#yestoAV if we can #getoutofbed
Voting felt a little strange this morning.
Not least because it was before nine and I was in a church hall. Not least because I was in a church hall at all. But because I was the only one.
Three helpful referendum assistants (I'm sure that's not their formal job title) jumped to tend to my every need.

One to take my postal invite, the other to cross of my name (very neatly) from a master list, the other to, I don't know, check pencils are sharpened well enough? He lingered, anyhoo.
Where was everyone else? Surely my Newquay town peers care about the future of our vote? Don't they?
With Cornwall's local elections put back until 2013, giving our new Unitary Council a fun-packed four-year term in office, perhaps people just weren't inclined to get out of bed to exercise democracy.
What a shame as it’s their very democracy at stake.
If there wasn't already enough reason to vote #yestoAV, as it's known on Twitter, this was the Mail's front page today:

Following an earlier tweet saying Hitler would have got into power 10 years earlier under FPTP, West Briton reporter Anthony Bonnici tweeted "Now really concerned no matter what voting system I pick the Nazis will get into power sooner or later".
Monday, 28 March 2011
How to make Crafty Curtains for your home
Patience is a virtue. Never more so than when making curtains.
First thing's first, get some space. Floor, table, wherever you can find it - the more flat space you have at your finger tips, the easier it will be.
What you'll need:

Each curtain will be the length of your window + 20cm x the width of your window +5cm.
Here's how to work out how much material you'll need:

Lay lining material out, right side up.
Pin your curtain tape along the top of the lining, 7.5cm down.
Lay your curtain material on top of it, right side down and pin all layers in place.
Sew 2.5cm around both lengths and the top of the fabric.
Repeat with second curtain.
Turn inside out (to right side) and iron flat.
Sew top and bottom lengths of tape through both lining and curtain material - in order to avoid wrinkles, sew both in same direction:

Gather the tape on one end so curtain is half the width it was (half the width of your window):

Slip hooks through the tape at even points about 8cm apart and hang:

Once your curtains have hung in place for a good 4 weeks, hem by12.5cm and re-hang
First thing's first, get some space. Floor, table, wherever you can find it - the more flat space you have at your finger tips, the easier it will be.
What you'll need:
- Curtain material (see how much you'll need below)
- Lining material
- Sewing machine
- Curtain tape (I used this one. The longer your curtains, the thicker your tape should be. Up to 2m drop = 2" tape. Up to 3m drop = 3" tape, and so on)
- Thread - similar colour to curtain material
- Tailors chalk
- An iron

Each curtain will be the length of your window + 20cm x the width of your window +5cm.
Here's how to work out how much material you'll need:

Lay lining material out, right side up.
Pin your curtain tape along the top of the lining, 7.5cm down.
Lay your curtain material on top of it, right side down and pin all layers in place.
Sew 2.5cm around both lengths and the top of the fabric.
Repeat with second curtain.
Turn inside out (to right side) and iron flat.
Sew top and bottom lengths of tape through both lining and curtain material - in order to avoid wrinkles, sew both in same direction:

Gather the tape on one end so curtain is half the width it was (half the width of your window):

Slip hooks through the tape at even points about 8cm apart and hang:

Once your curtains have hung in place for a good 4 weeks, hem by12.5cm and re-hang
How to make lovely squashy cushion covers
I vaguely remember making cushion covers while in Home Economics class at my very ancient all girls grammar school.
It was all frills and lace, tucks and turns back then.
But it really need not be that complicated. Here's a simple piping/zip cushion which you only need to be able to master a sewing machine to make...
Here's what you'll need:
 Get everything you need ready - it makes life 100% easier.
Take your 210cm length of bias cut 5.5cm wide fabric and fold in half (so it's just as long but 2.25cm wide)
Slip your piping into the crease and sew firmly into place.
Take your two squares of fabric which will form the front and rear of your cushion cover.
Cut the piece of fabric which will form the rear of the cushion in half.
Pin the zip and one half of fabric together - front sides facing each other - then sew:
 Do the same to the other half of the rear fabric so the zip is sewn into the the middle of the square of fabric.
Lay the rear square of fabric on the floor - right side facing up.
Take the length of piping and lay it around the 4 sides of the cushion - piping pointing inwards:

Take the front side square of fabric and lay it right side facing down
Pin all 3 layers firmly in place.
Sew all 4 sides together 2.5 cm from the edge.
Open the zip and flip inside out . Insert cushion.
Here's what you should have!:

It was all frills and lace, tucks and turns back then.
But it really need not be that complicated. Here's a simple piping/zip cushion which you only need to be able to master a sewing machine to make...
Here's what you'll need:
- A sewing machine
- A cushion (mine's 50cm x 50cm)
- Piping (4 x the width of your cushion + 10cm - so 210cm for me)
- Material 2 x (width + 5cm squared = 55cm)
- plus length of 5.5cm fabric cut on the bias for piping
- Dressmaking scissors
- Thread of similar colour to fabric
- Lots of pins
- Zip of similar colour to fabric
- Tailor's chalk
 Get everything you need ready - it makes life 100% easier.
Take your 210cm length of bias cut 5.5cm wide fabric and fold in half (so it's just as long but 2.25cm wide)
Slip your piping into the crease and sew firmly into place.
Take your two squares of fabric which will form the front and rear of your cushion cover.
Cut the piece of fabric which will form the rear of the cushion in half.
Pin the zip and one half of fabric together - front sides facing each other - then sew:
 Do the same to the other half of the rear fabric so the zip is sewn into the the middle of the square of fabric.
Lay the rear square of fabric on the floor - right side facing up.
Take the length of piping and lay it around the 4 sides of the cushion - piping pointing inwards:

Take the front side square of fabric and lay it right side facing down
Pin all 3 layers firmly in place.
Sew all 4 sides together 2.5 cm from the edge.
Open the zip and flip inside out . Insert cushion.
Here's what you should have!:

Sunday, 27 March 2011
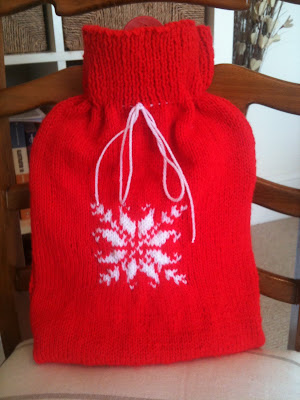
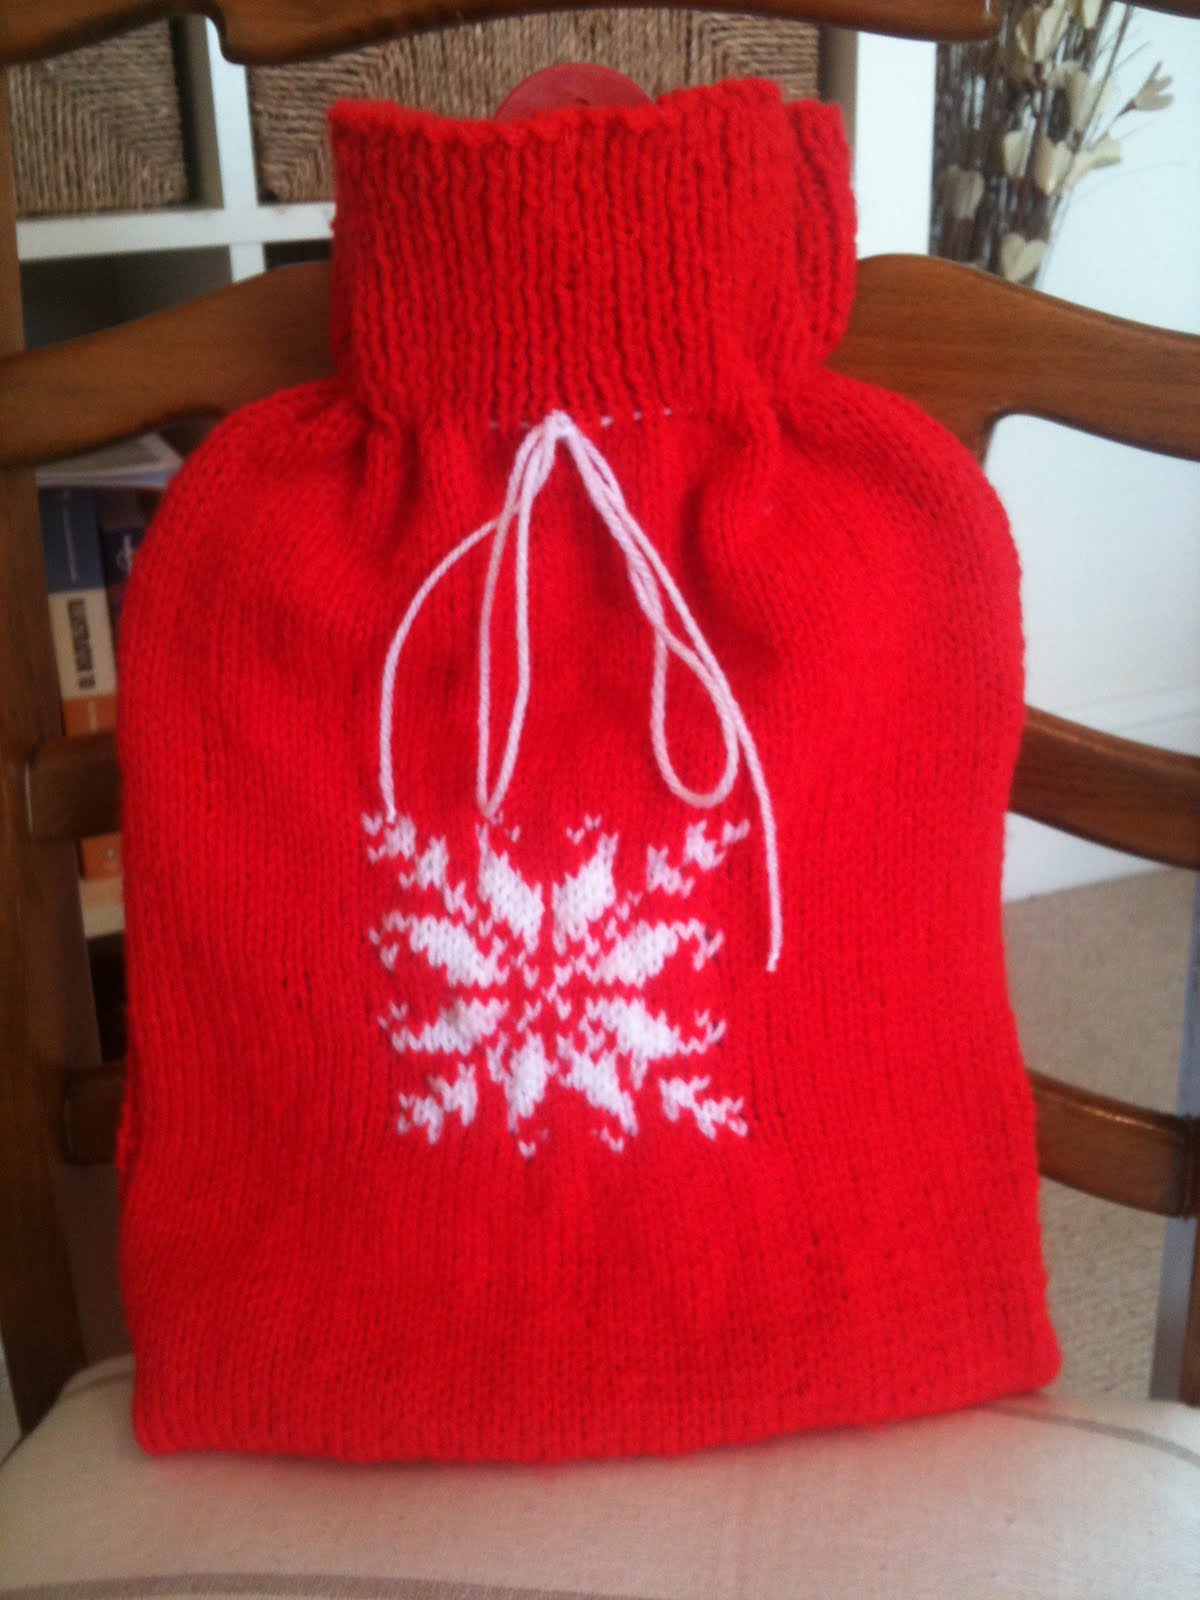
Snowflake hot water bottle cover
A great gift for mother's day, this hot water bottle cover is a real winner. It's pretty simple - if you don't fancy trying the snowflake you can just keep it plain both sides instead.
You will need:
 For the back:
Cast on 51st Stocking stitch for 35 rows
36: K14 red, K1 white (w), K1 red (r), K1 w, K4 r, K1w, K5 r, K1 w, K5 r, K1 w, K1 r, K1w, K14 r
37: P15 r, P2 w, P4 r, P1 w, P1 r, P1 w, P3 r ,P1 w, P1 r, P1 w, P4 r, P2 w, P15 r
38: K14 r, K3 w, K1 r, K1 w, K2 r, K1 w, K7 r, K1 w, K2 r, K1 w, K1 r, K3 w, K15 r
39: P17 r, P2 w, P2 r, P2 w, P5 r, P2 w, P2 r, P2 w, P17
40: K16 r, K3 w, K2 r, K3 w, K3 r, K3 w, K2 r, K3 w, K16 r
41: P19 r, P1 w, P1 r, P4 w, P1 r, P4 w, P1 r, P1 w, P19 r
42: K20 r, K1 w, K1 r, K3 w, K1 r, K3 w, K1 r, K1 w, K20 r
43: P15 r, P5 w, P1 r, P1 w, P1 r, P2 w, P1 r, P2 w, P1 r, P1 w, P1 r, P 5 w, P15 r
44: K14 r, K1 w, K2 r, K4 w, K1 r, K1 w, K1 r, K1 w, K1 r, K1 w, K 1 r, K1 w, K1 r, K4 w, K 2 r, K1 w, K14 r
45: P15 r, P1 w, P2 r, P4 w, P 1 r, P1 w, P3 r, P1 w, P1 r, P4 w, P2 r, P1 w, P15 r
46: K19 r, K4 w, K1 r, K1 w, K1 r, K1 w, K1 r, K4 w, K 19 r
47: P25 r, P1 r, P25 r
48: K19 r, K4 w, K1 r, K1 w, K1 r, K1 w, K1 r, K4 w, K 19 r
49: P15 r, P1 w, P2 r, P4 w, P 1 r, P1 w, P3 r, P1 w, P1 r, P4 w, P2 r, P1 w, P15 r
50: K14 r, K1 w, K2 r, K4 w, K1 r, K1 w, K1 r, K1 w, K1 r, K1 w, K 1 r, K1 w, K1 r, K4 w, K 2 r, K1 w, K14 r
51: P15 r, P5 w, P1 r, P1 w, P1 r, P2 w, P1 r, P2 w, P1 r, P1 w, P1 r, P 5 w, P15 r
52: K20 r, K1 w, K1 r, K3 w, K1 r, K3 w, K1 r, K1 w, K20 r
53: P19 r, P1 w, P1 r, P4 w, P1 r, P4 w, P1 r, P1 w, P19 r
54: K16 r, K3 w, K2 r, K3 w, K3 r, K3 w, K2 r, K3 w, K16 r
55: P17 r, P2 w, P2 r, P2 w, P5 r, P2 w, P2 r, P2 w, P17
56: K14 r, K3 w, K1 r, K1 w, K2 r, K1 w, K7 r, K1 w, K2 r, K1 w, K1 r, K3 w, K15 r
57: P15 r, P2 w, P4 r, P1 w, P1 r, P1 w, P3 r ,P1 w, P1 r, P1 w, P4 r, P2 w, P15 r
58: K14 r, K1 w, K1 r, K1 w, K4 r, K1w, K5 r, K1 w, K5 r, K1 w, K1 r, K1w, K14 r
Continue work in stocking stitch (red) until it reaches 30cm
Then K1, P1, K1, P1 etc for 7.5cm
Cast off loosely.
Arrange knitting right sides facing in. Stitch 2 lengths and bottom sides together. Now turn the right way round and stitch white yarn through the neck of the hot water bottle cover. Voila!
You will need:
- Red and white double knit yarn
- 4mm knitting needles
 For the back:
Cast on 51st (red)
Stocking stitch for 30cm
K1, P1, K1, P1... etc for 7.5cm
Cast off loosely.
For the front:Cast on 51st Stocking stitch for 35 rows
36: K14 red, K1 white (w), K1 red (r), K1 w, K4 r, K1w, K5 r, K1 w, K5 r, K1 w, K1 r, K1w, K14 r
37: P15 r, P2 w, P4 r, P1 w, P1 r, P1 w, P3 r ,P1 w, P1 r, P1 w, P4 r, P2 w, P15 r
38: K14 r, K3 w, K1 r, K1 w, K2 r, K1 w, K7 r, K1 w, K2 r, K1 w, K1 r, K3 w, K15 r
39: P17 r, P2 w, P2 r, P2 w, P5 r, P2 w, P2 r, P2 w, P17
40: K16 r, K3 w, K2 r, K3 w, K3 r, K3 w, K2 r, K3 w, K16 r
41: P19 r, P1 w, P1 r, P4 w, P1 r, P4 w, P1 r, P1 w, P19 r
42: K20 r, K1 w, K1 r, K3 w, K1 r, K3 w, K1 r, K1 w, K20 r
43: P15 r, P5 w, P1 r, P1 w, P1 r, P2 w, P1 r, P2 w, P1 r, P1 w, P1 r, P 5 w, P15 r
44: K14 r, K1 w, K2 r, K4 w, K1 r, K1 w, K1 r, K1 w, K1 r, K1 w, K 1 r, K1 w, K1 r, K4 w, K 2 r, K1 w, K14 r
45: P15 r, P1 w, P2 r, P4 w, P 1 r, P1 w, P3 r, P1 w, P1 r, P4 w, P2 r, P1 w, P15 r
46: K19 r, K4 w, K1 r, K1 w, K1 r, K1 w, K1 r, K4 w, K 19 r
47: P25 r, P1 r, P25 r
48: K19 r, K4 w, K1 r, K1 w, K1 r, K1 w, K1 r, K4 w, K 19 r
49: P15 r, P1 w, P2 r, P4 w, P 1 r, P1 w, P3 r, P1 w, P1 r, P4 w, P2 r, P1 w, P15 r
50: K14 r, K1 w, K2 r, K4 w, K1 r, K1 w, K1 r, K1 w, K1 r, K1 w, K 1 r, K1 w, K1 r, K4 w, K 2 r, K1 w, K14 r
51: P15 r, P5 w, P1 r, P1 w, P1 r, P2 w, P1 r, P2 w, P1 r, P1 w, P1 r, P 5 w, P15 r
52: K20 r, K1 w, K1 r, K3 w, K1 r, K3 w, K1 r, K1 w, K20 r
53: P19 r, P1 w, P1 r, P4 w, P1 r, P4 w, P1 r, P1 w, P19 r
54: K16 r, K3 w, K2 r, K3 w, K3 r, K3 w, K2 r, K3 w, K16 r
55: P17 r, P2 w, P2 r, P2 w, P5 r, P2 w, P2 r, P2 w, P17
56: K14 r, K3 w, K1 r, K1 w, K2 r, K1 w, K7 r, K1 w, K2 r, K1 w, K1 r, K3 w, K15 r
57: P15 r, P2 w, P4 r, P1 w, P1 r, P1 w, P3 r ,P1 w, P1 r, P1 w, P4 r, P2 w, P15 r
58: K14 r, K1 w, K1 r, K1 w, K4 r, K1w, K5 r, K1 w, K5 r, K1 w, K1 r, K1w, K14 r
Continue work in stocking stitch (red) until it reaches 30cm
Then K1, P1, K1, P1 etc for 7.5cm
Cast off loosely.
Arrange knitting right sides facing in. Stitch 2 lengths and bottom sides together. Now turn the right way round and stitch white yarn through the neck of the hot water bottle cover. Voila!
Prussia Cove Sandy Lamp
 Here's a lovely little trick I learned from family holidays to an estate in south Cornwall. They used wine bottles but you can use any type of bottle - here I've used an old olive oil bottle.
What you'll need:
- An old bottle
- Sand from your favourite beach
- A small lampshade A bulb (60watt)
- A bottle lamp holder adaptor (I used this one)
 First thing's first - get the sand into the bottle. By hook or crook. If you're brighter than me you'll use a funnel... Bang the bottom of the bottle on a hard surface a couple of times while filing to shift the sand down into it:
  Next, attach the lightshade and lightbulb to the adaptor:
Hey presto: plug it in and switch it on!


Subscribe to:
Posts (Atom)